
The scene editor
The integrated scene editor works in two modes: 2D and 3D view. In 2D mode you draw the outline of your map by placing tiles on the grid. In 3D mode you model out the details of your map like: Texturing, setting floor/ceiling height, placing objects and so on. The 3D mode also gives a basic impression about what your map would look like in your actual game, as you can move through the scene using classic FPS controls (W/A/S/D/mouselook)
Starting the editor and creating a map
First of all, get the REVERT3D package from the download page if you haven't done yet. This tutorial was created using the Demo version 8.0.1b but it should also work with newer versions.
 Start Revert3d.exe - Now you should see the scene editors main menu (Pic 1)
 Click the "New map" button and the map property dialog will appear (Pic 2) Enter a map name, but keep the dimensions as they are (The standard size is 64 x 64 tiles) You might wonder about the size being 64 x 64 and not like 60 x 60 - This has something to do with REVERT3Ds map data management. To keep it simple for the moment: It divides the map into smaller subregions to boost performance. With the size being a power of 2, its easy to break down the subregions without producing fractional values (the next subregion size would be 32 x 32, then 16 x 16, 8 x 8 ...)
 Now hit "Ok" and you will end up in the 2D editor view displaying an empty map (Pic 3) The 2D view is divided into a toolbar at the top of the window and the map view filling the rest of it. The toolbar contains buttons to select the tile type (P3/A), various tools to change pensize, toggle textures and lighting (P3/B), buttons to save/close or test the map (P3/C) and general informations about the cursor position inside the map space (P3/D). Right after creating the map, you will probably see an eye-like symbol and a "FX" icon in the middle of the screen. The "eye" is the current camera position that will be used when you switch to 3D mode. Don't worry about the meaning of that "FX" icon yet: Its the automatically created "player" object as well as another object at the same position which contains various informations about the scene - But more on that later.
Navigating in 2D view mode
The actual map is much larger than the portion you will see right after the start. You can use the mousewheel or +/- keys on your keyboard to zoom the view in or out. To scroll the map either use the arrow keys or right click and hold anywhere into the map to "drag" it around using the mouse. You can change the camera position by pointing the cursor to the desired location and pressing C - However, you should leave the cam where it is for now.
Your first room
In the case you played around with the navigation controls, first navigate back to the camera (the "eye").
 Now click on the second / the white tile symbol in the toolbar (P4/A). The "active tile" info to the upper right should now read "Active tile: Open" (P4/C). You can now place open tiles on the grid using the mouse and left button. Holding the left button while moving the mouse will just "draw" the tiles like in a paint program. Draw a filled rectangle of open tiles around the camera, select the third/ solid tile from the toolbar (P4/B) and draw another rectangle around the open one, so it becomes a room looking like in Pic 4. Pretty easy. You can now switch between the 2D mode and the 3D/first person view by pressing Tab (Pic 5).
Navigating in 3D view mode
 In 3D mode you can move around in a classic FPS manner using W/A/S/D keys and mouselook. If you move out of the room, you probably wouldn't see anything anymore because R3D would try to render void tiles what would make it hard to find your way back. So in the case you get lost: Press Tab to return to 2D mode and move the camera back into the room by pressing C.
Beside these controls there is Z(Y)/X to move up/down and C to toggle between fly- and clipmode. "Flymode" is the default mode in which the camera always follows the cursor in all directions, while "clipmode" will make the camera kind of stick to the floor, which helps to move through the scene more "game-like". By default the movement is quite fast and good to get around the map quickly. If you need more precise movement hold down Shift while moving.
Tile modeling
 Beside showing you what the map would look like in an actual game, the main task of the 3D view mode is to model the map and add details like textures and objects. Now that you are familiar with moving around in 3D space, move to a tile of your choice, point the cursor to the floor and press PageUp a few times. As you will see, the floor moves up (Pic 6) PageDn would have an opposite effect, of course. This also works for the ceiling in the same way.
 Try to move the ceiling down, to make it look like in Pic 7.
We now want to tilt the floor and ceiling to make it look sloped. To do this, point to the ceiling or floor again and press Ctrl + Up/Down/Left or Right a few times, depending on which side you want to tilt.
 It works more or less view-dependent, so pressing Ctrl+Left should always tilt the tiles left side from your point of view. It works best, if you look at the tile from a straight ~90° angle (Pic 8)
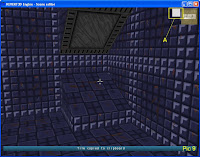 Tiles can also be copy/pasted. To copy your "sloped-tile", point to one of its surfaces (it doesn't matter if its the ceiling, floor or a wall) and press Ctrl+C. A small symbol resembling the tile type will appear in the upper right (Pic 9/A), indicating that theres a tile on the clipboard. To paste it, point to the desired location (pointing to the floor when doing this, is a good idea) and press Ctrl+V.
 We repeatedly paste the tile all along the wall to make it look like in Pic 10.
Texturing
 You probably already wondered about that "REVERT3D" symbol in the upper right of the window (Pic 11/A) - It indicates the currently selected texture. This "REVERT3D" texture you see right at the start has some special function, since this is the "dummy texture" that will be used when no other texture has been selected or somethings wrong with it (file not found, wrong texture id, ... )
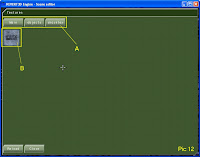 To get a list of all available textures hit B on your keyboard and the texture browser will open (Pic 12) It is divided into a row of buttons (P12/A) for each subdirectory into the texture folder and the texture list (P12/B). Click on a button to see which textures are inside that folder. You can scroll through the textures by using either arrow keys, PageUp/PageDown or the mousewheel. To select a texture, simply left-click on it and the browser will close, returning to the 3D view. The selected texture will now be indicated to the upper right. Apply the texture to any surface by pointing at it and pressing T.
 You can change way the texture is mapped by adjusting its offset and scale (Pic 13). "Offset" shifts the starting position of the texture - You can use this to align a texture with the floor or ceiling (P13/A) Point to the surface and use the arrow keys to do this. "Scale" will stretch the texture. You can use this to make a texture "repeat" on a surface. Hold shift while using the arrow keys to perform this. (P13/B)
Objects
 The placement of objects works pretty much like the texture assignment: Open the object browser by pressing Ctrl+B and select one by left-clicking on it. You will find yourself back in 3D view with the selected object visible to the upper right (Pic 14/A). The object can now be placed which works in two steps: Positioning and release. Lets select the "Spock" object from the object browser, then press O to insert the selected object. The object now follows your movement right in front of you in some distance from your position. Use the mousewheel to shorten the distance or extend it into your viewing direction. A 3D axis-cross will appear to help you make out the distance to surrounding objects or tiles (P14/C). The box around the object shows its physical boundaries which will be used for collision detection (P14/B). Just move around using the 3D controls until the object gets into the desired location. Place O or G again to release it. If the object has a mass and is affected by gravity it will fall to the ground if you release it in mid-air - But more on that later.
To change the position of an already placed object, point the cursor on it and press G. This will "grab" the object and return you into "positioning mode".
To rotate an object use Alt+Arrow keys while pointing at it. If you are in "positioning mode", you can also hold the right mouse button to rotate around the Y axis. To change the size of an object use Shift+Arrow keys. If you want to completely remove an object from the scene, point at it and press Del.
Lighting
Internally, lights are just regular objects with the difference that they "shade" surrounding tiles and other objects. They can be created by just pressing L or selecting a "light object" from the object browser (Ctrl+O). The positioning works the same like for a "normal" object. To see how the light actually affects the surrounding scene, press Ctrl+L to toggle the scene lighting on/off while in 3D view mode.
 Lights are set up with a color, lighting- and "fadeoff"-range. While the range value specifies the total radius in tiles which will be affected by the lightsource, the "fadeoff" range can be used to make a light look either "soft" or "hard".
It defines the range in tiles, at which the light will affect the scene in full intensity. The lower this value, the more "soft" the lighting. The difference is best noteable when you look at the scene in 2D mode, with lighting turned on (Pic 15 A/B).
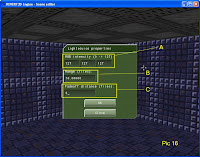 Light properties can be edited by left clicking on the object while in 3D mode (Pic 16). Use the color values to define the color intensity for each channel (red/green/blue - P16/A). Be careful not to set the range and fadeoff-range values (P16/B/C) too high, because every affected tile must be recalculated, what can consume some computing time depending on your values :) For most situations, its better to place multiple lights with a short range < 10 tiles than one huge lightsource with long range. While editing a map, sometimes you will notice that the shading of tiles and objects looks weird when reworking the scene after inserting a lightsource. Thats because the lightsource will only calculate once, in the moment you create it. However, you can force recalculation by moving the lightsource a bit. These issues only occur while editing, since the engine recalculates all lightsources in a map right after loading it. So in an actual game, it would look right in any case.
Testing the map
Now that our scene has a room, some objects stuff and a lightsource, it's time to test it under real "gaming conditions". Before we enter the testmode, we switch back to 2D mode by pressing Tab, save the map using the button on the toolbar and ensure the camera to be inside the room. If not, point somewhere into the room and press C. The testmode will launch the map using the standard game implementation - Some kind of "game prototype" that can easily be transformed into your game using the scripting engine and/or the Visual C++ programming interface. In the default implementation, you can move through the map using classic W/A/S/D/mouselook controls and space to jump. Now, press the "Test map" button on the toolbar to launch the testmode. You can press ESC to return to the editors.
thx, this helped a lot!
ReplyDeleteHow do you use 2d objects?
ReplyDelete